
|
(:slideshow fontscale=0.7:) Preparing for TutorialKick-off Notes Pre-Tutorial Notes 2022 Acknowledgements to Michaela Marx (DESY) michaela.marx@desy.de presented by David Button (ANSTO) david.button@ansto.gov.au
Other useful tools
Processing Transparencies & Embedding AnimationsProcessing Transparencies - What to do before you start, updated by Michaela Marx (May 2022),What to do before you start Presented at JACoW 2019 Team Meeting, Santos, Brazil, 2-6 December 2019 Processing Transparencies and Embedding Animations, presented by Jan Chrin, Processsing Transparancies and Embedding Animations 2019TM.pptx Processsing Transparancies and Embedding Animations 2019TM.pdf Presented at JACoW 2018 Team Meeting, iThemba Labs, South Africa, 3-7 December 2018 Update to Processing Transparencies, presented by Jan Chrin on behalf of Michaela Marx, Update on Processing Slides (TM2018).pptx Contact: Michaela Marx (DESY) michaela.marx@desy.de Description:This page will describe the process used by the presentations editor to convert oral slide presentations into a pdf for inclusion in conference proceedings, and publication to the JACoW repository. Speakers are utilizing over a number of years now more and more media in their presentations thus the production of the pdf in such cases requires to embedding of videos to preserve the communication and demonstration of concepts as intended by the author. This page will also give instruction on how this is done. Overview:The content of this topic has been broken up into the following sections to be explain separately in detail.
Existing Resources:Michaela Marx should be honorably acknowledged for her dedication on producing help content over the years to assist with the processing of slides. The existing repository of information can be found at Guidelines for Processing Slides 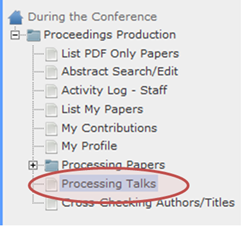
Software & Configuration RequirementsThe workstation which you use for the processing of slides should have a base configuration of the Paper Editing workstations, this means it has all the JACoW custom configurations, see;
Additional SoftwareIn addition the workstation should have the following extra software installed;
NEWSLIDEConfiguring PowerPoint Split Animations Add-InThe PPspliT PowerPoint Split Animation Tool can be downloaded from here PPsplitT. The zip file password is:“ppsplit”  All credit to the author of the Add-In After installing the PPspliT Add-In and restarting your copy of PowerPoint you will have a new ribbon strip with splitting tools. 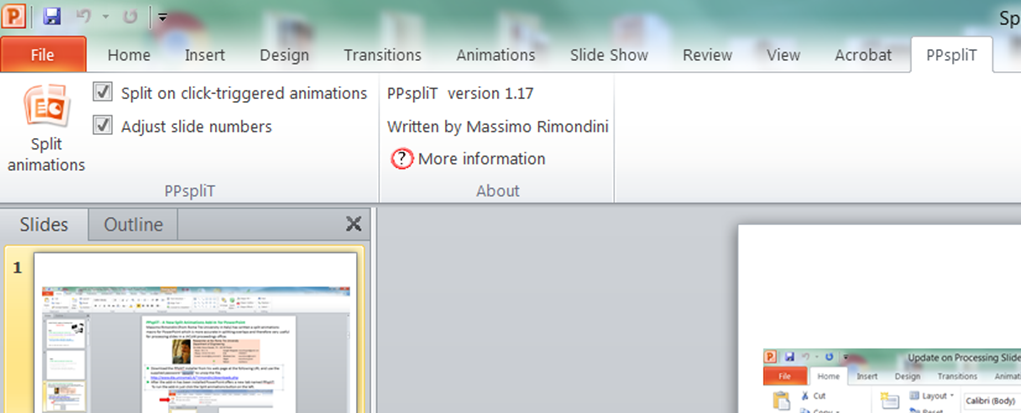 Old Split Animation ToolAfter downloading the Split Animations Add-in you need to add this to your local copy of MS PowerPoint. To do this in goto File > Options > Add-Ins > [Manage: "PowerPoint Add-ins"] Press Go 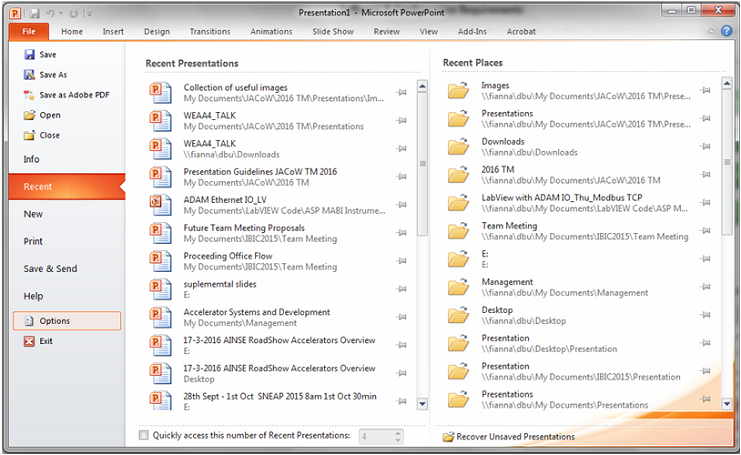 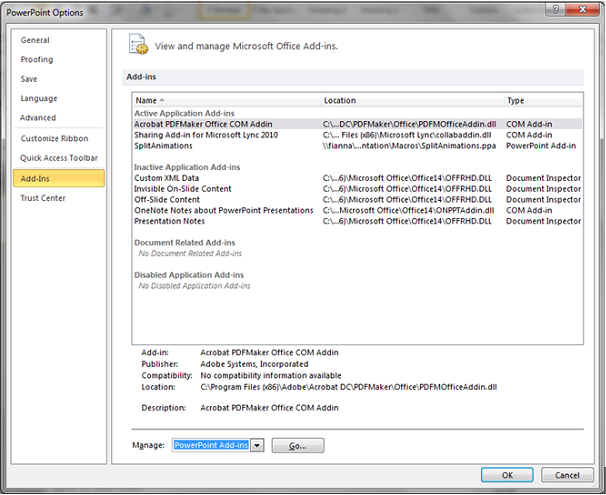 In the popup menu, if SplitAnimations is there make sure it is checked, if not there click Add New, then browse and select the before downloaded SplitAnimations.ppa file. 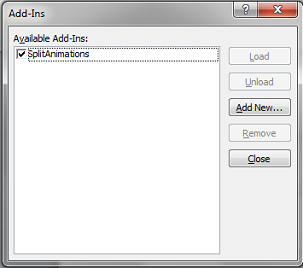 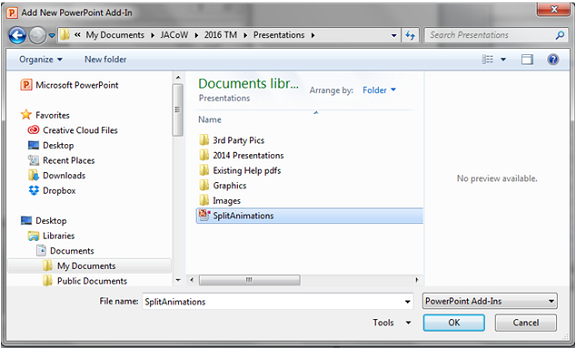 Confirm all the screens, now you should have a new Icon on the Add-Ins ribbon. 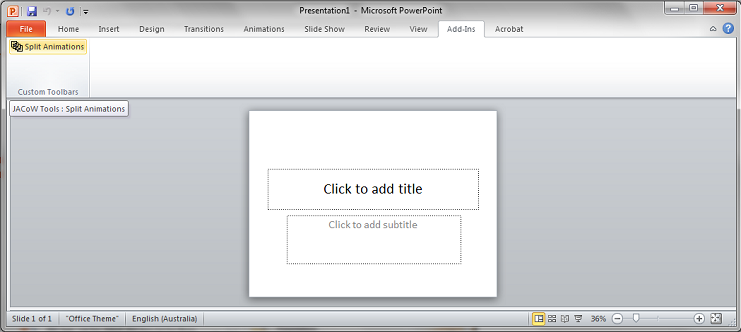 The Process of Editing Slides:Slide Presentations Processing deals with one part of what is typically a two part submission by the Author. The Author will upload into SPMS their paper submission which is processed by the Conference Editors also known as the Saltmine’s Team who work in the Proceedings Office, and as part of that team is the Transparency Editor who either conducts this role as their sole activity, or swap into this role during the course of proceedings processing. See Fig.1 below. The Proceedings Office is managed by the Chief Editor and should help moderate work flow. The Process of Editing Slides(Cont.):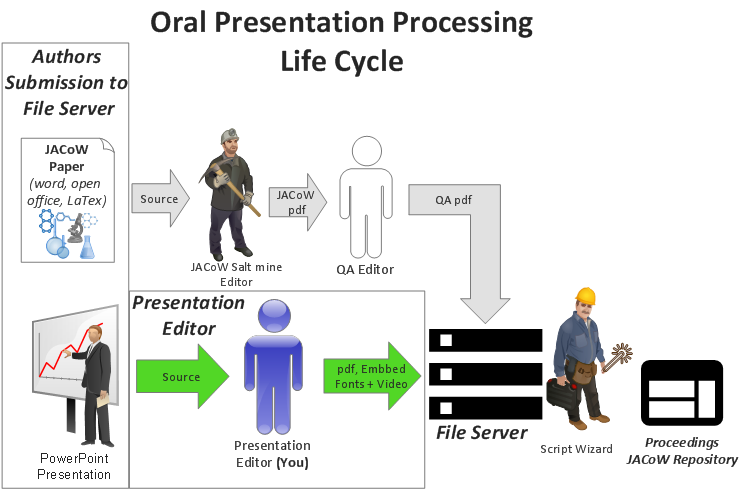 Figure 1: The simplistic Life Cycle of an Oral Presentation in relation to production of proceedings. Note: The term Presentation Editor and Transparency Editor are regularly interchanged as prior to Digital Projection of Slide Presentations authors who use transparent film slide on an Overhead Projection system. Presentations processing only apply to oral presentations, and are conducted after the presentation has been presented. It is not untypical for Authors to request that some slide and images be removed from their presentation during or before. This may be due to issues such as patient confidentiality in the case of Hadron Therapy presentations for example. The goal of the Transparency Editor is to produce pdf files which have all fonts embedded, as well as relevant video media uploaded to the Conference SPMS instance File Server for inclusion into the final Proceedings. Procedure of Processing SlidesAs with other activities the process of processing slides has been grouped into a Role in SPMS. These privileges have to be setup in SPMS by a SPMS Conference Administrator prior to enable this functionality to the Transparency Editor/s. Please see the section below which covers this. The procedure for processing slides is always the same,
See Fig.2 flow chart of typical procedure. 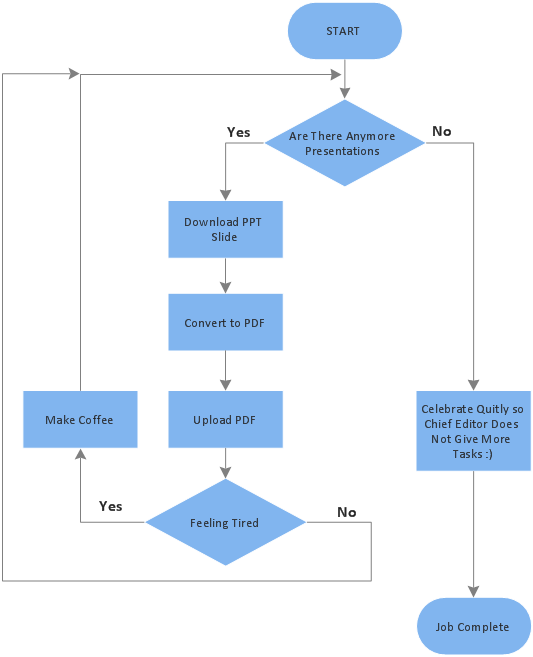 Figure 2: This is the flow diagram of the procedure used by Transparency Editors to process slides. This process is a time-consuming job, especially for embedded movies and animated GIF’s as each item has to be converted and embedded individually. SPMS Privileges for Slide ProcessingThe delegation of privileges within SPMS can only be completed by a SPMS instance user who has Conference Administration privilege. As the Administrator you need to navigate to Overall Database Administration > Privileges, Roles & Users > Authorize page, note once the privileges have been changed for the user they must log out and back in again to activate this privileges. See Fig. 3. 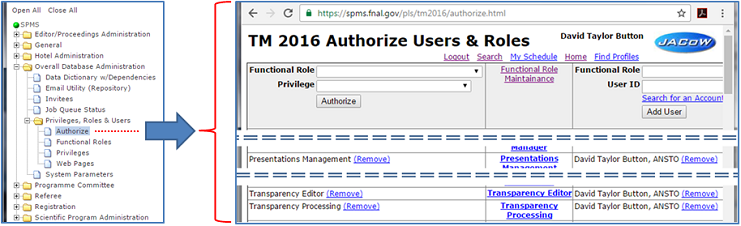 Figure 3: Each Functional Role should have the Privilege added; each role Presentations Management, Transparency Editor, and Transparency Processing' should have the User added who is tasked with the presentation processing. SPMS Login PrivilegesOnce the privileges have been allocated like all changes in user privileges you will have to logout and back in again. When logging in you should select the privileges shown below in Fig.4. 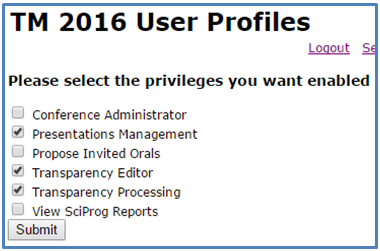 Figure 4: When the presentation processing staff login they must select the above privileges to be able to use the required features in SPMS. SPMS Processing SlidesIf you have not logged into SPMS with the above mentioned permissions please logout and activate the privileges mentioned above. To start processing the slides you need to select in the menu Presentation Management > Transparency Processing This is shown in Fig. 5 below. 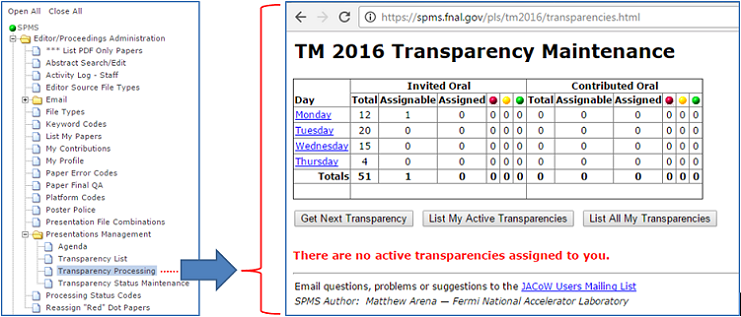 Figure 5: This is the page that you will process slide/transparencies from. When you can revise the table in Fig. 5 to see if the transparencies are available. You only process transparencies which have been presented. The functionality of processing slides is similar to that of processing paper, in Fig. 5 you Click On Get Next Transparency. After clicking of the Get Next Transparency button you will be displayed the screen below in Fig. 6. This screen gives you access to the presentation that you will process, the main functions on this screen to point out are;
Figure 6: This screen gives you access to Download, Upload, and Set the Status of the presentation. Downloading TransparenciesBy Clicking on the Download link in Fig. 6, you will be given a new screen with the download options, if there is a PDF already provided by the author download this to review that it looks correctly, and that all the fonts are embedded. The download screen is seen below in Fig. 7. 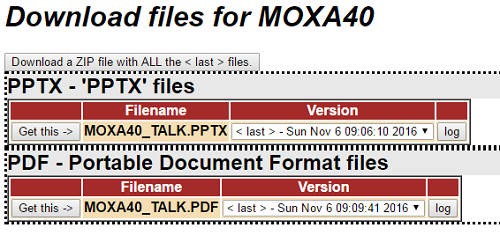 Figure 7: This page allows you to download the individual PDF, PPT, or PPTX files to process, or the ZIP bundle. Download the required files to your local work-space so that you can process them into a pdf, if the author has not provided a PDF. Even if the author has provided a PDF, it must be checked for visual correctness including poor graphics, missing characters, and font embedding. This is very much the same as processing papers in this regard. Uploading Transparencies (Talk)By Clicking on the Upload link in Fig. 6, you will be given a new screen with the upload options see Fig. 8. In this screen you Must Select File Type Transparency, the file that you are uploading must be named "Paper ID_TALK.PDF", for example: "MOXA40_TALK.PDF". To upload your prepared PDF, first find it on your local drive by Clicking Choose File, fill in any optional comment, and Click on Upload File. 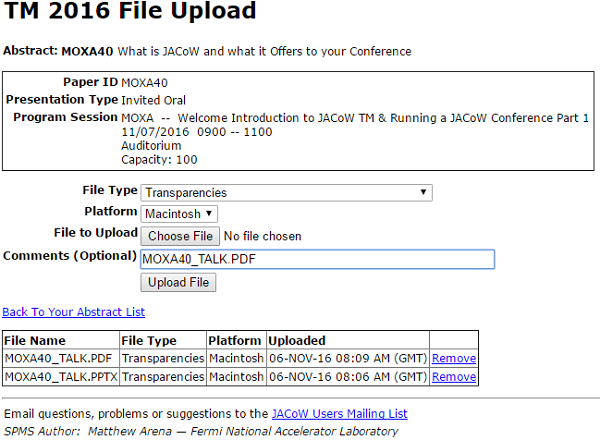 Figure 8: This page allows you to upload the prepared PDF to the SPMS file server. Setting Transparency StatusOnce you are happy with the new PDF file that you have uploaded you can set the "Transparency Status" to GREEN, unlike papers where the production of a PDF from the source requires you to set the status to YELLOW with transparencies you go to GREEN. Typically you will email with an Author if there are any issues, but you can choose to set the status to RED if you wish. To set the status you simple select the Status from the drop down box, and Click on Set Status button. see Fig. 9 below. 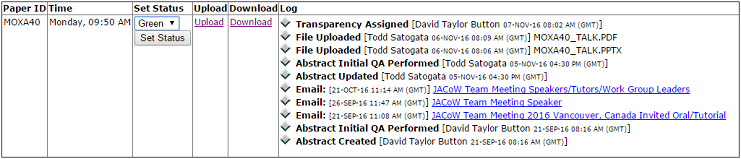 Figure 9: This basic menu allows you to set the Status of a transparency to either GREEN, YELLOW, or RED. Producing PDF of TransparenciesThe aim of the Presentation Processing Editor is to produce JACoW compliant PDF files of the presentations for inclusion in the proceedings. In the case of the presentations you do not have to edit the type setting or layout of the paper against the JACoW template, but you still have to make sure of the following;
Producing PDF FilesThere are 4 ways to produce a PDF file if you are not lucky enough to of had the author provide you one. These consist of;
Note: All PDF's must have a define name Paper_ID_TALK.PDF, for example "MOXA40_TALK.PDF". Print to Adobe PDFTo produce a PDF this way, follow the normal process of printing.
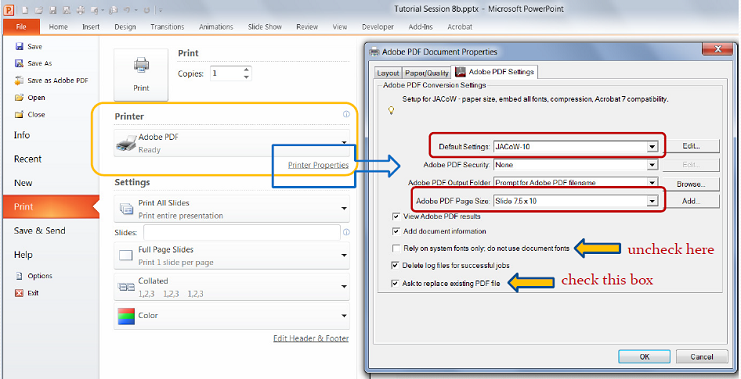 If you have used this method to produce the PDF you will need to open the PDF and rotate it within Acrobat and re save. This is done with the Page Rotate Tool. See below. 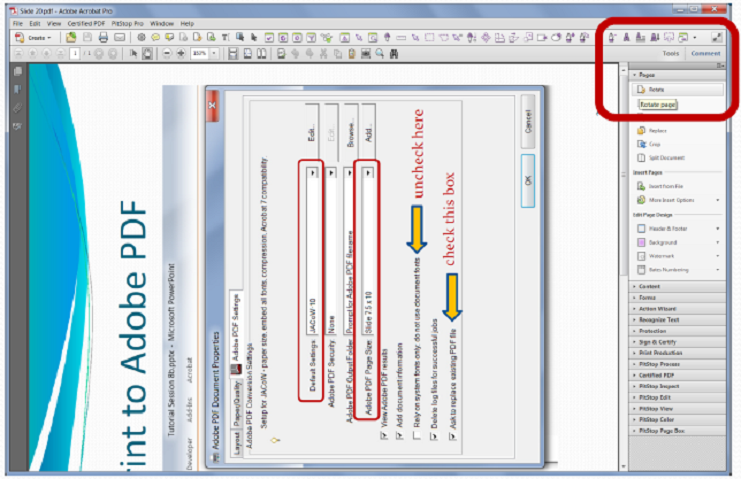 Save As PDFWhen using the Save As method, be careful not to select Save as Adobe PDF, select the actual Save As. In the Save As Screen make sure to Select Save AS Type: PDF (*.pdf), go into Options and Tools to emabed the fonts and compress pictures to document resolution. This can all be seen below. 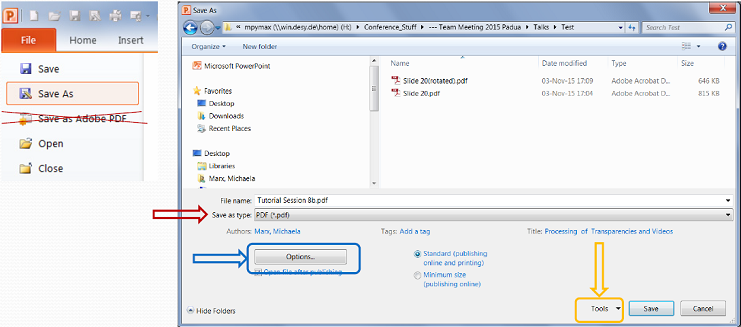 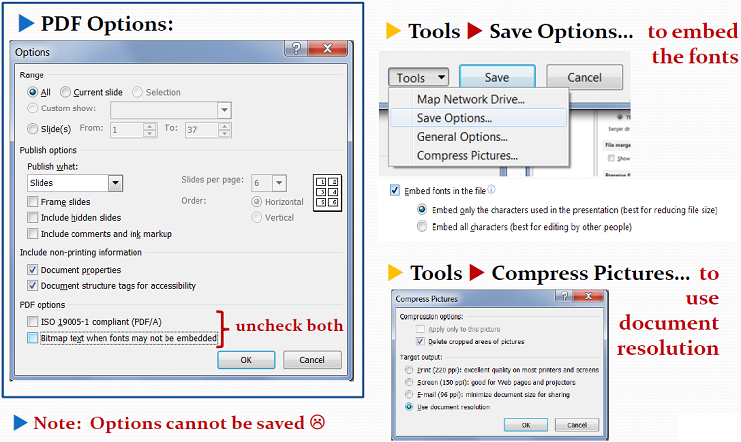 Acrobat PDFMakerAdobe PDF Maker is a nice tool which integrates into the MS PowerPoint ribbon, and menu system. However Do Not us the menu based Save as Adobe PDF as it dose not give you the option of changing the preferences. If Adobe Media Encoder is installed this process has the bonus of embedding some videos directly into the PDF. This is demonstrated below. 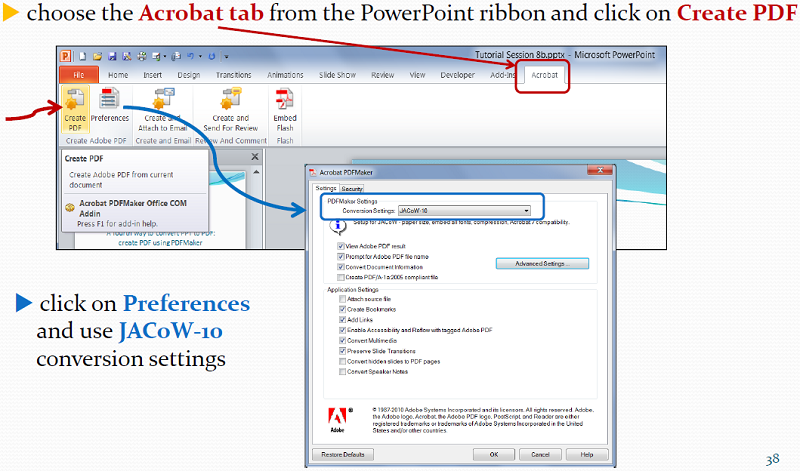 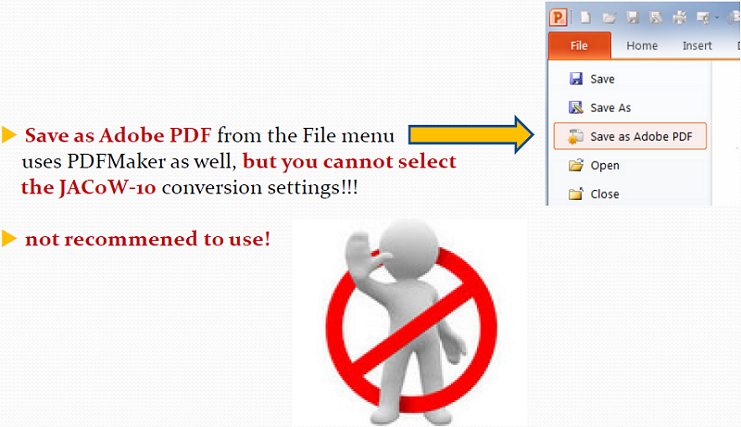 Why So Many Ways to Make a PDF?As you process slide you will find cases where one process of generating the PDF will have errors in it, but when using an alternative method it seems to give the expected result. Below is an example of a slide which was converted to a PDF with the Print, and Save As method. Note that layering of the logo in the left hand side is incorrect in the Print as PDF method verses the Save As PDF method. 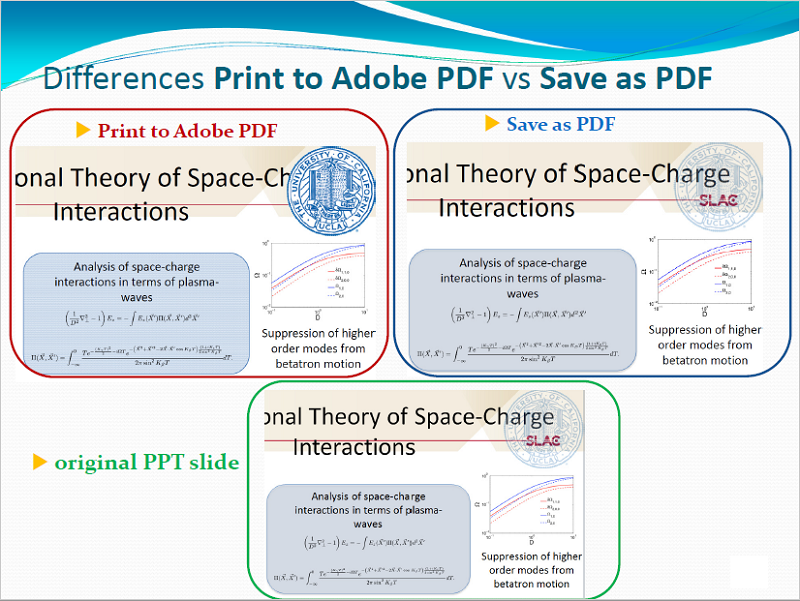 Splitting Slide AnimationsWhen reviewing a PowerPoint presentation you walk through the presentation and observe the behavior of the PowerPoint animations. It is important to remember that when you produce a PDF all the Transitions and Animations are lost or flattened. To get the same effect of item appearing between Clicks can be achieved with duplicates of the slides being created and incrementally building to the final configuration of the slide. Some authors will construct there slide in an additive manner so items appear on the screen into regions which are free of overlap, such for example when paragraphs of text are hidden before they are discussed. These slides typical do not need any modification before producing the PDF version. Some slides however have the artistic licence by which during the presentation new items or text may obscure or overlap on other content, this is shown bellow. 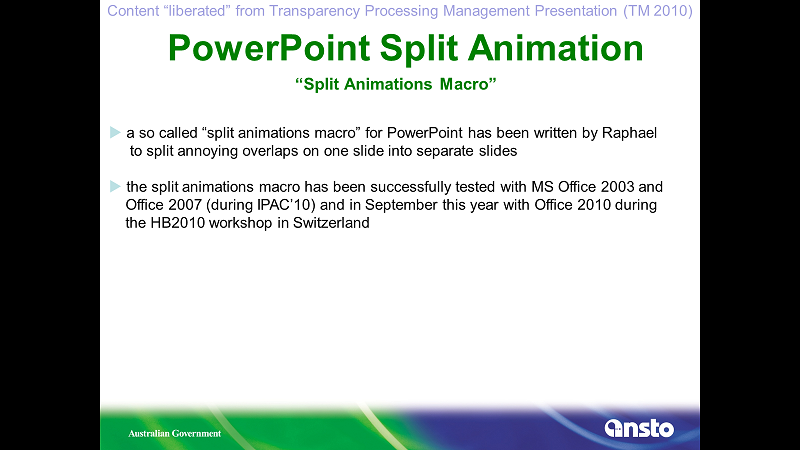 Before Click  After Click There are 3 ways to resolve this problem.
Below is an example of a single slide which has been duplicated to make 5 separate slides to give the similar functionality during a PDF presentation. 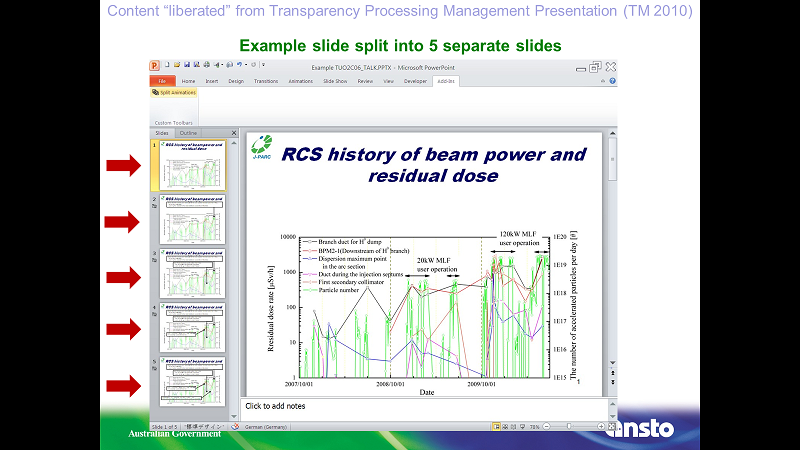 Embedding AnimationsSince Adobe Acrobat 9.0, movie embedding has been supported by the PDF format. JACoW has made the decision to support this as part of the proceedings archive. Supported Video Formats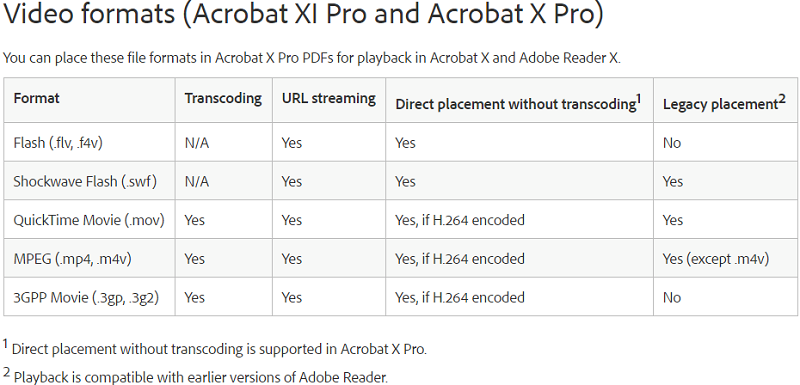 Note: It is Extremely important to make sure all videos prepared are H.264 Encoded. Accessing MS PowerPoint Media Files for Conversion(Transcoding), and EmbeddingMS PowerPoint files .pptx like all of the Office .***x files are actually nicely bundled zip files. This can be taken advantaged of at access typically animated GIF's and Movie files so they can be processed. to do this you do the following.
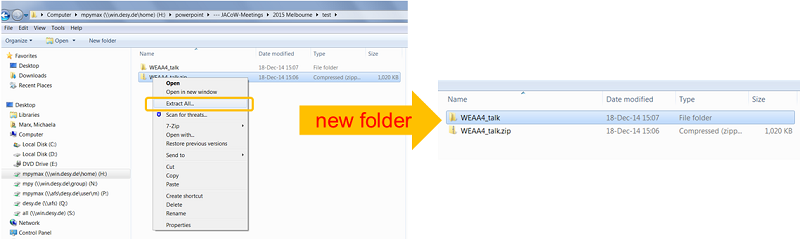 You will find all the files in folder "TopDirectoryName"> ppt > media Preparing Media for EmbeddingThere are 3 main types of media that you are going to have to process in to capture the video animations that an author has included in their presentation.
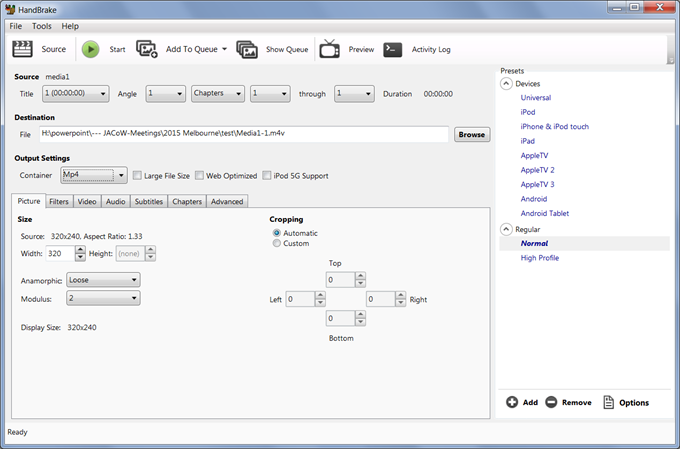
Processing Video Files with Handbrake Handbrake is the standard tool which has been used to transencode an existing video into a compliant *.m4v, or *.mpg with the H.264 encoding so that it can be embedded into the PDF. Note: Transencoding just means re-encoding from one format to another. To use this tool with default installed settings you need to;
 There are some alternative tools you may find helpful for processing the video files into the compliant format, and also the Free Rotate Tool for videos that appear in the final document 90 degree rotated, oneof these will be shown in the Tutorial. Adobe Media Encoder CChttp://www.adobe.com/products/mediaencoder.html 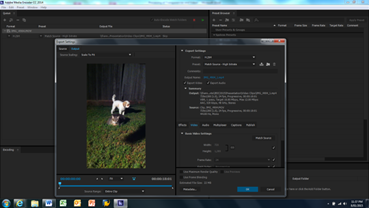 All round video encoder, is trial version available preforming task of HandBrake, and Free Video Flip and Rotate. I have found this tool useful as the BitRate of viedos can be adjusted to produce smaller files. Videos in 4K of more than 500MB have been presented in the past, the file server by default want accept a file over 100MB, thus adjustment to the BitRate needs to be reduced. Note: Adobe Create “Attempts” video embedding automatically when this package installed on your workstation. Free Video Flip and RotateNote: the software will try and install extras during installation, just uncheck where possible during installation. 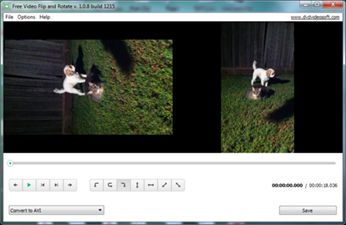 Tool which can be used to rotate and flip videos if meta data is lost. This step to be done before final transecoding in HandBrake. Processing Animated GIF Files with VirtualDubhttp://sourceforge.net/projects/virtualdub/ 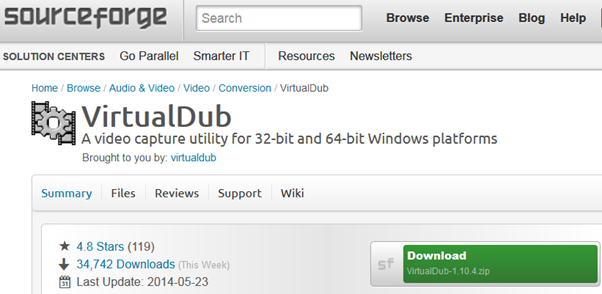 Animated GIFs must be converted from GIF to AVI, and then finally can be converter to one of the compatible formats for embedding into the PDF. This can be done using firstly VirtualDub to convert the animated GIF to AVI. 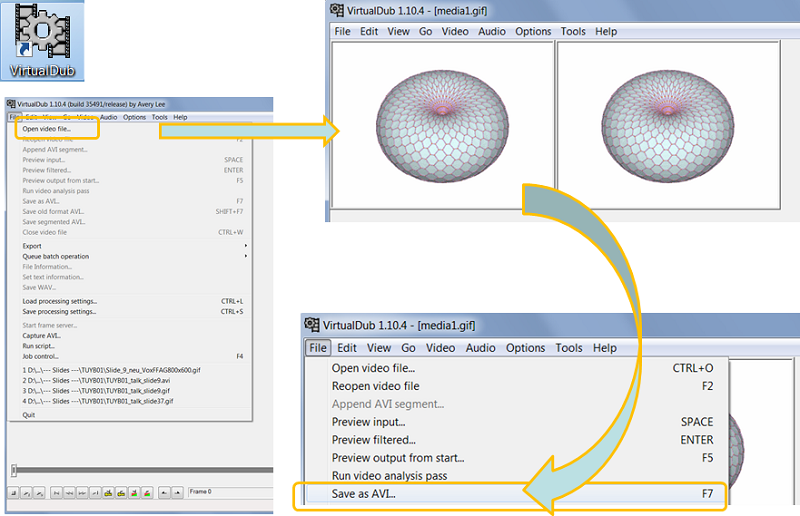  Example Animated GIF of ANSTO STAR 2 Million Volt Tandetron Accelerator High Voltage Generator Capturing Screen Section with CamStudioTo be added  Embedding Video into PDF Document with AcrobatOnce you have prepared your initial PDF of the presentation, and process the video files into the correct format it is a simple process of using the Tools > Content > Multimedia > Video insertion tool. Using this toll you drag an area where the video is to be placed, then continue to select the file. 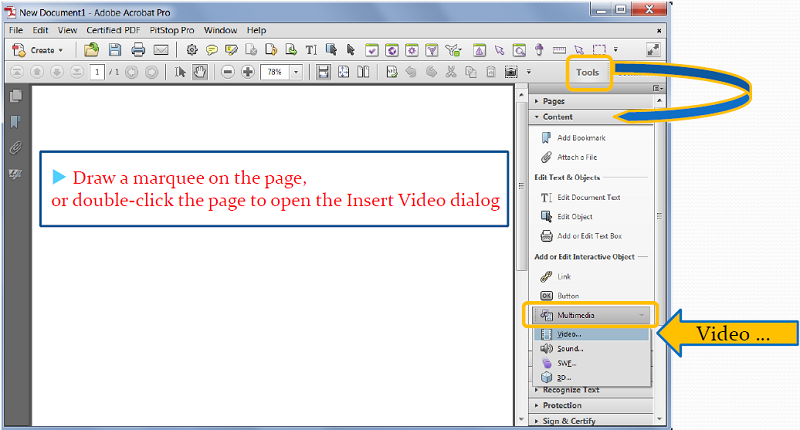 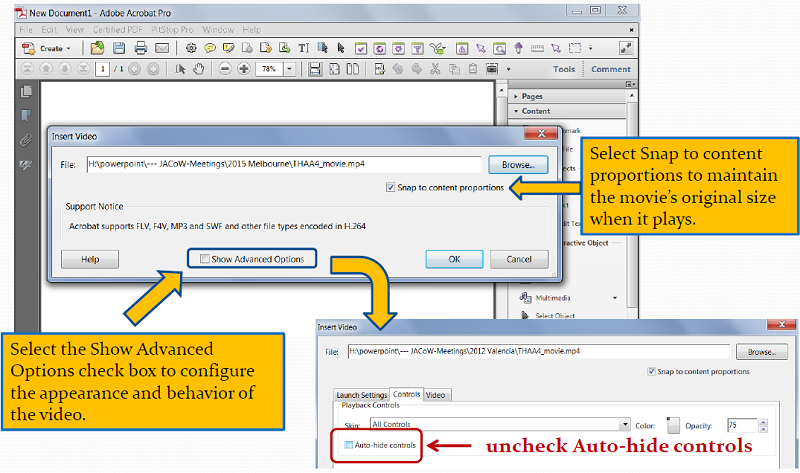 Statistics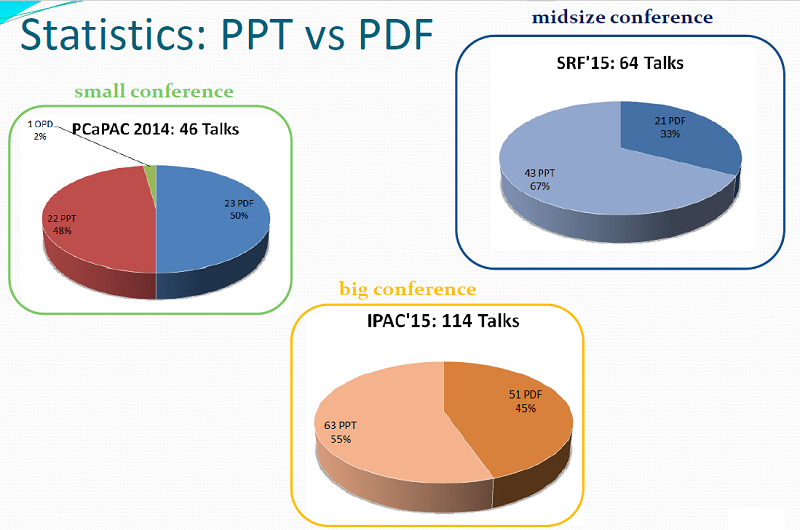 |